| Author |
Message |
Jump to forum Jump to topic |
| MarioFan2014 |
|
Posted: January 28th, 2015, 11:01 pm
|
|
|
1. use the wizard on this website & select 1 of the 3 settings.
A.the top takes a whole space... its like paint bucket on paint...
B.the other 1 allows you to draw a space to erase... good for erasing lines & stuff
C.the box is good for removing 1 whole difficult area
2. click save... BUT... don,t select any of them... drag image to new tab.
3.goto imgur & copy pictures link from new tab... paste into url & upload.
4.Your Done...
http://www.online-image-editor.com/
http://imgur.com/ |
|
 |
Jump to forum Jump to topic |
| LOCKjaw |
|
Posted: February 5th, 2015, 10:26 pm
|
|
|
|
|
Jump to forum Jump to topic |
| Halloween |
|
Posted: November 27th, 2014, 6:26 am
|
|
|
►Eyes:
http://i.imgur.com/4h5q59j.png
http://i.imgur.com/aId0L3q.png
►Glasses:
http://i.imgur.com/aj2qmU9.png
http://i.imgur.com/rGhiMiv.png
(Thanks kano for the UV map http://s.cdn.gaiaonline.com/images/common/emotion_smilies/icon_kirakira.gif )
►Face:
http://i.imgur.com/h4BVlHn.png
http://i.imgur.com/dqGrBaZ.png
*For editing purposes! 200kb size limit in-game
Remember to stay inside the lines, kiddies! ;)
oyea & leave a http://aotskins.com/styles/1Game2/imageset/thankposts.gif if yatta yatta, you get it. |
|
|
Jump to forum Jump to topic |
| Ghegi |
|
Posted: October 10th, 2014, 8:43 pm
|
|
|
「Perspective Tutorials」|「Shintaro's Hair Making Style」
H owdy skinners! I am Shintaro, a member of a group named "Perspective". In this thread, I am going to show you how I make hair skins and it is going to be different if you compare it on my tutorial before. This is kind of a Toon Style. We will be using mouse in this tutorial not like any other people, they use Tablet. Well, I can't afford that. LOL :lol:
W hat you need:
A dobe Illustrator CS6
A dobe Photoshop CS6
H air Brush for Adobe Illustrator
S etting of the Hair Brush
_____________________________________________________
In this tutorial, we will be making Ene's hair from Kagerou Project
F irst step is opening to open Ps and Ai.
http://i.imgur.com/MxWLUjG.png
S et the pixels to 512x512
http://i.imgur.com/rsE5RVh.png
I mport your file by opening File > Place
http://i.imgur.com/FUSWlrg.png
D rag the picture by pressing Shift + Drag image
http://i.imgur.com/DiiH10M.png
F ind the image you want to copy and paste it on Ai. Create a new layer for your vector art.
http://i.imgur.com/ZQwROCE.png
Use Shaz Hair Brush 6 pt for outlining the thick outline.
http://i.imgur.com/DuXbQNv.png
3 pt for details
http://i.imgur.com/C0hR7m9.png
Co py the vector layer (Ctrl+C)
http://i.imgur.com/js5FxEO.png
P aste it in Ps as a smart object
http://i.imgur.com/pjxpeRq.png
F ill the background layer with the hair color
http://i.imgur.com/h9wkrxB.png
Erase the unwanted parts by using polygonal lasso tool and eraser
http://i.imgur.com/2sTRdAH.png
Add shadows by using the lasso tool and brush w/ dark hair color
http://i.imgur.com/hoQWl9A.png
Add highlights
http://i.imgur.com/A2eJgyp.png
Outcome
http://i.imgur.com/CM69I62.png
Skin file : http://i.imgur.com/8aT8aLI.png
That's all, hope you learned something new. :)
_____________________________________________________
P lease click that http://aotskins.com/styles/1Game2/imageset/thankposts.gif button If you think this tutorial helped you. That's nothing compared to days of work to make this for you. :D Thank you |
|
|
Jump to forum Jump to topic |
| creepyken |
|
Posted: October 15th, 2014, 12:00 am
|
|
|
|
|
Jump to forum Jump to topic |
| StrayHunter |
|
Posted: March 17th, 2015, 2:44 pm
|
|
|
It really bothers me that i didn't saw any empty templates to help out the begginers,so i made one. If you like it,please leave a thank. It helps me out a lot.
The skins come in a .rar file. Im not an asshole who would put viruses in it,but if you are not sure run a security scan.
http://www26.zippyshare.com/v/PmyIBykU/file.html
You can now access the images here, or via Imgur albums. As well as using the link above. (Considering this was posted in the Skin Compilation section, it should have already been posted this way).
-W W
Hoodies
http://i.imgur.com/DwRrOHX.png
http://i.imgur.com/XmQF9KN.png
Hair
http://imgur.com/a/fyQve
Eyes
http://imgur.com/a/UUUgX
Face and Glass
http://i.imgur.com/yktIwH6.png
http://i.imgur.com/xNoULCg.png
Blade and 3DMG
http://i.imgur.com/M74QHgt.png
Cape and Logo
http://i.imgur.com/Lk4I9hB.png
http://i.imgur.com/8zKxGzW.png |
|
|
Jump to forum Jump to topic |
| WillSmithIsMyHero |
|
Posted: December 18th, 2015, 12:38 am
|
|
|

*:・゚✧Recolors*:・゚✧ Album Link
If you have any special color requests, hit me up. I'll recolor it for you ,':] |
|
|
Jump to forum Jump to topic |
| Gameboy8 |
|
Posted: March 12th, 2015, 11:25 am
|
|
|
HD Male Hair files
(1024x1024 pixels)
I made this for everyone to use/edit for Public Post or Private Use
its an Editable File for you to EASILY Recolor Male Hair Texture FAST
How to use this?
* First, Click that http://aotskins.com/styles/1Game2/imageset/thankposts.gif Button Below :lol: (if you find it useful ofc)
* Download the Hair Files Below and open it to an Image Editing Program.
* The File has a separate Layer For the COLOR , SHADE and LINES
* use the Paint Bucket Tool to recolor the COLOR LAYER for the color of your choice
* keep the SHADE LAYER opacity to less than 100% or how strong you want it to be
and YOU'RE DONE :D
Tips:
*I also recolor the LINES LAYER by editing its Hue by Pressing Ctrl + U and making it to a Darker color of the COLOR LAYER
*And also change the Layer Style of the SHADE LAYER to Overlay or Multiply , it depends on the color.
Like this:
http://i.imgur.com/EKbUeOL.png
Program needed:
Adobe Photoshop - PSD File
Pixlr - PXD File
(I don't know how to use other program sorry)
And try running them at TinyPNG to meet the required file size (200KB Max) after you're done with recoloring the texture
Enjoy your HD Hair Texture :D
Hair Files:
Male Hair_0:
Preview:
http://i.imgur.com/SyFrfaC.png
PSD File:
Link
PXD File:
Link
Male Hair_1:
Preview:
http://i.imgur.com/odG2FgM.png
PSD File:
Link
PXD File:
Link
Male Hair_6: (Jean's Hair)
Preview:
http://i.imgur.com/51y1iHO.png
PSD File:
Link
PXD File:
Link
Male Hair_4: (Eren's Hair)
Preview:
http://i.imgur.com/xtgZZzY.png
PSD File:
Link
PXD File:
Link
Basic Rules
8. Do NOT plagiarize. Skins must be your own creation, or shared with permission.
means You Do Not Have the Permission To Repost the Texture, just Relink this Post
if you are going to share a public skin using this, just credit me and Relink this Post, Thanks
I hope you guys Like it :D
I'LL try doing other male hair, just comment it below so i would know what to prioritize :D
「 Click Here for the HD female Hair 」
Hit that http://aotskins.com/styles/1Game2/imageset/thankposts.gif Button below if you see it useful :D Thanks |
|
|
Jump to forum Jump to topic |
| Gameboy8 |
|
Posted: March 13th, 2015, 7:44 am
|
|
|
HD Female Hair files
1024x1024 pixels
I made this for everyone to use/edit for Public Post or Private Use
its an Editable File for you to EASILY Recolor Female Hair Texture FAST
How to use this?
* First, Click that http://aotskins.com/styles/1Game2/imageset/thankposts.gif Button Below :lol: (if you find it useful ofc)
* Download the Hair Files Below and open it to an Image Editing Program.
* The File has a separate Layer For the COLOR , SHADE and LINES
* Use the Paint Bucket Tool to recolor the COLOR LAYER for the color of your choice
* Keep the SHADE LAYER opacity to less than 100% or how strong you want it to be
and YOU'RE DONE :D
Tips:
*I also recolor the LINES LAYER by editing its Hue by Pressing Ctrl + U and making it to a Darker color of the COLOR LAYER
*And also change the Layer Style of the SHADE LAYER to Overlay or Multiply , it depends on the color.
Like this:
http://i.imgur.com/AL5YT7v.png
http://embed.gyazo.com/aea7dc364aa42bc8297287f024b84f74.png
Program needed:
Adobe Photoshop - PSD File
Pixlr - PXD File
(I don't know how to use other program sorry)
And try running them at TinyPNG to meet the required file size (200KB Max) after you're done with recoloring the texture
Enjoy your HD Hair Texture :D
Hair Files:
FEMALE hair_4:(Miku's Hair?)
Preview:
http://i.imgur.com/Uy13jax.png
PSD File:
Link
PXD File:
Link
FEMALE hair_5:(Annie's Hair)
Preview:
http://i.imgur.com/yd8esDi.png
PSD File:
Link
PXD File:
Link
FEMALE hair_6:(Hange's Hair)
(I added another layer for the Color of Her Eyeglass Strap and Hair Tie)
Preview:
http://i.imgur.com/0NPktlu.png
PSD File:
Link
PXD File:
Link
FEMALE hair_7:(Mikasa's Hair)
Preview:
http://i.imgur.com/L5e4buD.png
PSD File:
Link
PXD File:
Link
FEMALE hair_10:(Sasha's Hair)
Preview:
http://i.imgur.com/Fbu1yr2.png
PSD File:
Link
PXD File:
Link
I hope you guys Like it :D
Basic Rules
8. Do NOT plagiarize. Skins must be your own creation, or shared with permission.
means You Do Not Have the Permission To Repost the Texture, just Relink this Post
if you are going to share a public skin using this, just credit me and Relink this Post, Thanks
I'LL try doing other female hair, just comment it below so i would know what to prioritize :D
「 Click Here for the HD Male Hair 」
Hit that http://aotskins.com/styles/1Game2/imageset/thankposts.gif Button below if you see it useful :D Thanks |
|
|
Global announcement Jump to topic |
| Guest |
|
|
|
|
Jump to forum Jump to topic |
| BrokenRail |
|
Posted: June 7th, 2016, 8:10 am
|
|
|
Colored UV Maps. I just have the casual outfits done at the moment due to a mixture of laziness and GTA. I will try to finish and upload the other outfits later (probably tomorrow)
Female Casual A - http://i.imgur.com/k5Ffl9z.png
Female Casual B - http://i.imgur.com/YukaUGO.png
Male Casual A - http://i.imgur.com/w43W2qx.png
Male Casual B - http://i.imgur.com/ieJgwlE.png
Hopefully these are somewhat close to the first colored templates that were posted.
If anything needs fixing or to be added let me know
I may add other textures like the cape and 3dmg if people want them. |
|
|
Jump to forum Jump to topic |
| Ghegi |
|
Posted: October 11th, 2014, 3:51 pm
|
|
|
「Perspective Tutorials」|「Shintaro's Costuming Style」
H owdy skinners! I am Shintaro, a member of a group named "Perspective". My fourth tutorial, this is gonna be awesome so follow me.
W hat you need:
A dobe Illustrator CS6
A dobe Photoshop CS6
H air Brush for Adobe Illustrator
S etting of the Hair Brush
_____________________________________________________
In this tutorial, we will be making Ene's Costume from Kagerou Project
F irst step is opening to open Ps and Ai.
http://i.imgur.com/MxWLUjG.png
S et the pixels to 512x512
http://i.imgur.com/M42PqAT.png
Get an image of what you're copyin'
http://i.imgur.com/Hv3n8VE.png
Make a new layer for vector and start outlinin'
http://i.imgur.com/ChgTObV.png
Paste it in photoshop
http://i.imgur.com/Ozr42gw.png
http://i.imgur.com/nTRNbrZ.png
Start coloring and add every details needed
http://i.imgur.com/c3ybqj1.png
Outcome
http://i.imgur.com/NZ4ZKvf.png
Skin file: http://i.imgur.com/421sjGr.png
That's all, hope you learned something new. :)
_____________________________________________________
P lease click that http://aotskins.com/styles/1Game2/imageset/thankposts.gif button If you think this tutorial helped you. That's nothing compared to days of work to make this for you. :D Thank you |
|
|
Jump to forum Jump to topic |
| SupaMika |
|
Posted: May 24th, 2015, 2:20 pm
|
|
|
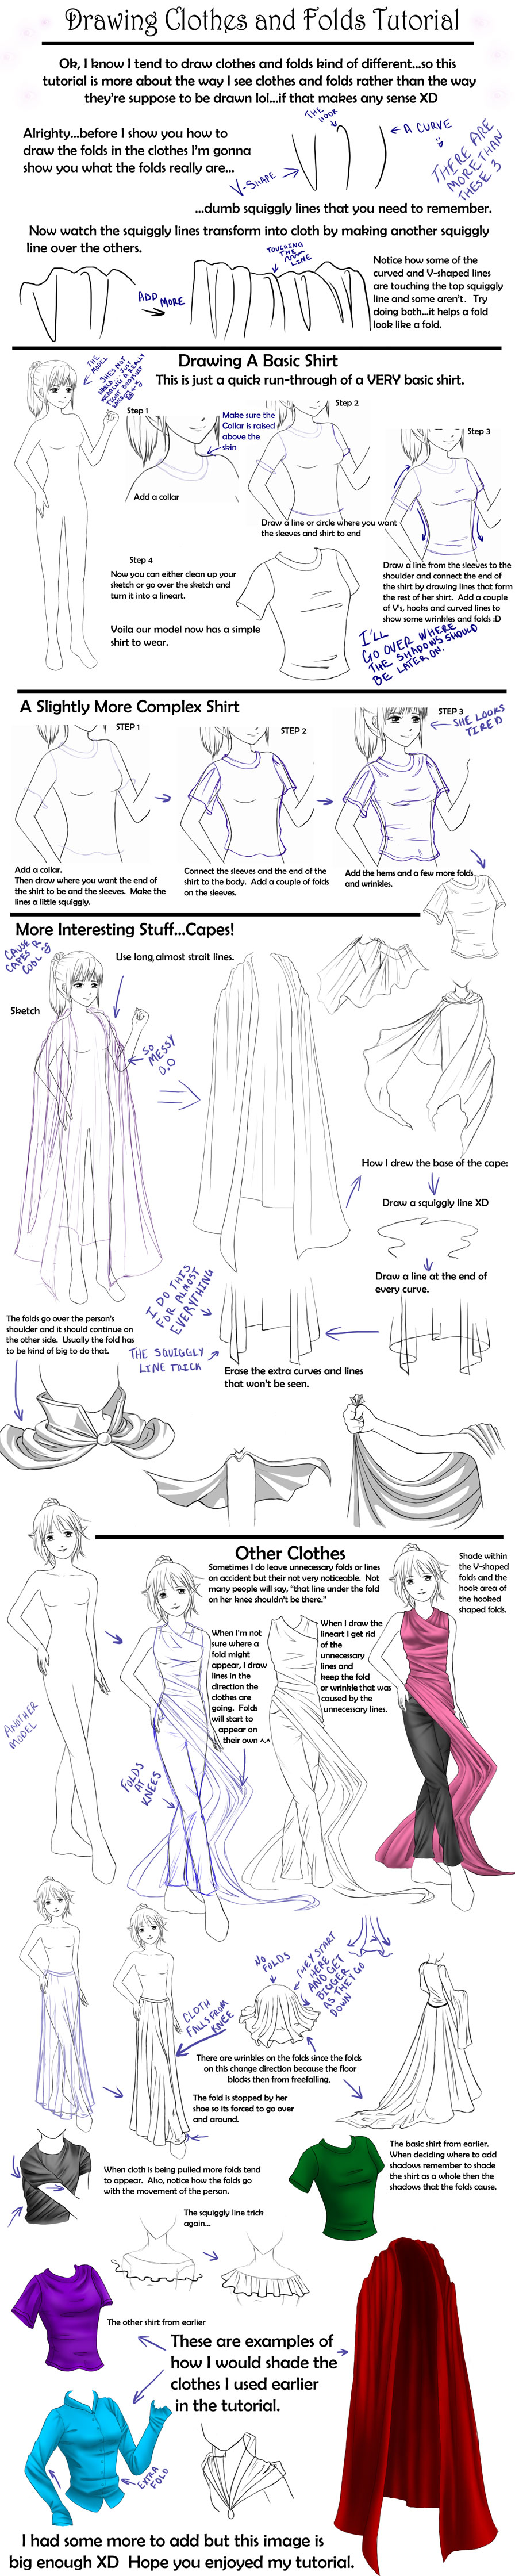
Here's a quick tutorial on making skirts for your costumes, with a template provided to make it easier. Keep in mind the skirt will be very short due to model limitations, but it doesn't look too bad in game.
Here's the template:
http://i.imgur.com/pbsfsud.png
To use it, make another layer above your texture when editing and paste the template on that layer. You can merge the layers after editing the template. Here's how it should look when editing:
http://i.imgur.com/cb76G5b.png
Here's how the template looks in game. I made the rest of the costume black so that it's easier to see the skirt:
http://i.imgur.com/rpde0K5.png
That's basically all you need to do. I'll show some examples of some of my textures with skirts, and how they look in game. It should help you figure out how to edit them, especially if your skirt has a design on it.
http://i.imgur.com/Ia2c5T7.png http://i.imgur.com/xAxJFrT.png
http://i.imgur.com/Fbi9oUS.png http://i.imgur.com/thBDqUL.png
http://i.imgur.com/fOzH3eS.png http://i.imgur.com/dYxIcS0.png
If you use the templates don't forget post a link to this tutorial and leave a thanks, it would be greatly appreciated. Let me know if any clarification is needed. |
|
|
Jump to forum Jump to topic |
| narikochwan |
|
Posted: October 7th, 2014, 7:59 pm
|
|
|
Good evening my creative friends!
I wanna show you how to create a skin
in the new RC mod version.
1. First we have to think about which model we
want for each part. We need to choose a hair model and
a costume as well. (Of course a cape if you want one)
We dont need eyes because theyre just textures
on the face.
2. So now we know which modells we need and which not.
Next step is to create our "Build".
We can choose one of the sets as shown.
http://i.imgur.com/oJZJTLP.jpg
3. When you found your hairstyle and costume you
go and write down the hair number and the costume number.
(Normal people can keep it in mind as well)
4. The next step is to download the skins folder from
the RC Mod homepage!
http://i.imgur.com/QibT7q5.jpg
5. Well done! Now you have the skins and the hair/costume numbers!
Now we will sort out what we need, this is pretty easy :3
http://i.imgur.com/dTkutJI.jpg
Okay, for example... I took hair 10 and costume 1
What will i do now?
In the folders you will find the textures numbered.
In the hair folder for example something like...
Female_Hair_01, Female_Hair_02...
I chose hair 9 so i delete everything except of my Female_Hair_09!
Same for costume.
I took costume 1 so i delete every texture except of costume 1.
6. Now you should have your Costume and your Hair texture.
Next step is to take every texture you need else.
Skin, gas, 3D gear... etc.
Then you put it together and you will have everything you need.
7. Now you can start editing!
http://i.imgur.com/sZrC1ZJ.jpg
8. At the end you do the same as always.
You upload your textures (imgur.com or something similar)
take the direct link and insert the links to the correct places.
When you want to play now don't forget to choose the correct set!
Congrats! You succesfully created your skin :3
http://i.imgur.com/dK1aOT3.jpg
If not just message me, i love to help! (I don't bite :3 )
http://i.imgur.com/AKsoqUF.png |
|
|
Jump to forum Jump to topic |
| Halloween |
|
Posted: November 5th, 2015, 5:00 am
|
|
|
►Yes, as a tiny person you are now a murderer

look at those dead eyes, she knows what she's done
Happy slaying~ |
|
|
Jump to forum Jump to topic |
| Annie |
|
Posted: May 30th, 2016, 7:19 pm
|
|
|
H e e e e y , b e e n a w h i l e x 3
O k a y s o t h i s c o s t u m e w a s r e q u e s t e d b y ' T h e S h a d o w E m p r e s s s ' y e s t e r d a y .
A n d i t s l i t e r a l l y m y f i r s t t i m e m a k i n g a s k i r t ' - ' I h a t e . . . j u s t H A T E m a k i n g s k i r t s b e c a u s e i t t a k e s a l o t o f t i m e Q ~ Q O h w e l l o . o /
H o p e y o u a l l l o v e t h i s !
S c r e e n s h o t : ~
http://imgur.com/qHnkgrb.png
C o s t u m e : ~
http://imgur.com/itblLlU.png
S l a m t h a t T h a n k b u t t o n ! ^ ~ ^ |
|
|
Jump to forum Jump to topic |
| Katt |
|
Posted: June 23rd, 2016, 10:36 am
|
|
|
|
|
Jump to forum Jump to topic |
| SupaMika |
|
Posted: March 17th, 2015, 7:41 pm
|
|
|
|
|
Jump to forum Jump to topic |
| Kao |
|
Posted: May 13th, 2016, 6:48 am
|
|
|
Uh, hi :)
I started making skins two days ago and and here's my first costume that I wanted to share ^^
http://i.imgur.com/vdBdFm5.png
And here's a screenshot:
http://i.imgur.com/r3lKpUw.png
Thank you for checking this costume out. Have fun! :D
PS: Wear Costume_8 when you use this costume.
Bye! ^^ |
|
|
Jump to forum Jump to topic |
| Marion |
|
Posted: November 17th, 2015, 5:29 am
|
|
|
Heyy its been so long since I posted! Following my previous hair skin, I decided to make more colours now! ^_^ I'm super happy to see some people use it! Sorry if the image is a bit blur, and I don't own the other skins except the hair! Also pls don't repost anywhere as your own ok?Thank youu!
Light Pink
http://i.imgur.com/lT1Pv3P.png
LINK: http://i.imgur.com/ILass7J.png
Cyan
http://i.imgur.com/okZf5n8.jpg
LINK: http://i.imgur.com/IeDiZKe.png
Autumn/Orange
http://i.imgur.com/Go6mg0t.jpg
LINK: http://i.imgur.com/G3VeLYi.png
Purple
http://i.imgur.com/3j2KpFw.jpg
LINK: http://i.imgur.com/h7gFc9g.png
Lime Green
http://i.imgur.com/zsWvm6H.jpg
LINK: http://i.imgur.com/XSk7qEg.png
Have a Great day! ^_^ |
|
|
|

